Monday, February 1, 2010
Come on over to my new place!
Hello people interested in photography!!!! Just to let you know, there won't be any more posts on this blog, for they have all moved, old and new, to my new site; http://jimmyamerica.com/. comma. So from all of us here at me, hope to see you there!!!
Monday, December 28, 2009
Bringing apertures into focus!
Apertures. You might not know what they are, but I guarantee you that you have two of them with you right now. Even if you don’t have your camera with you. Even if you are completely buck-nekkid lying in bed right now with nothing but a cup of tea and your computer. Figured out where they are yet? Your eyes!!!!! Oh wait, you don’t wear an eye patch do you? Cuz then you’d only have one. And if you don’t have eyes then I really admire you for choosing photography as a hobby. The aperture related to photography is located inside your cameras lens and is made up of a series of blades and just like your pupils, a cameras aperture expands and contracts to control the amount of light let in. See look, just check out the table below.
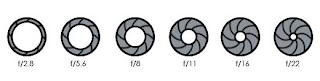
Pretty neat huh? As you can see as the f value decreases, the width increases. Just in case you are still trying to figure out my aperture-as-to-eyeballs analogy. When you walk into a dark room your pupils expand so that you can see. More light in, easier to see. Then someone turns on the light and it’s blinding. This is why when you want to do low-light photography it is best to buy a lens that has a wider than normal aperture. Unfortunately for photographers on a budget, this may mean using what’s called a “Fixed focal length” or “Prime” Lens.
If you have bought a DSLR that came with a lens then I’m 90% sure that it’s a zoom lens, meaning that it can zoom in and out. They do this because they are versatile lenses, not anything to write home about really, but great for getting started. Now if you look at the top of your lens you will see the name. Mine is named “AF-S Nikkor 18-55mm 1:3.5-5.6G VR” or “snappy” for short.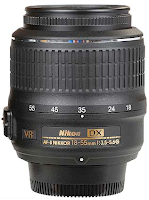 I could go into what all the other stuff means and I will in another post but for now all we are concerned in is the 18-55 and the 3.5-5.6. This means that when my camera is all the way zoomed out at 18mm, the widest aperture I can use is f/3.5 and when I zoom in all the way to 55mm the widest I can use is limited to f/5.6. This is common with zoom lenses and in order to get wider apertures when you zoom in, you are going to have to spend more money. Of course there are exceptions that prove the rule.
You: “Hey Jimmy, how about an example?”
Me: I’M GETTING TO THAT!!!!!!
The Sigma APO 70-200mm F2.8 II EX DG Macro HSM Lens is, in my own opinion, the best super zoom lens in terms of value for money you can get at a measly $845. All the way zoomed in at 200mm, you can still use an f/2.8 aperture. Similar lenses such as the Nikon AF-S 70-200mm F2.8 G VR II will set you back a whopping $3,299!!! And it’s a HUGE lens! Of course the picture quality and performance is better, but at this point in time I can not justify buying a lens that was $600 less than my first car.
Getting back on topic, maybe $845 is still too much, but you really want to get into gig photography. Well don’t despair just yet, there is that other option, the prime lens.
Prime lens con: they don’t zoom at all, if you want a close up, you physically need to move closer. Pro: Wider apertures at cheaper prices!!!! On eBay you can get a Nikon AF 50mm f/1.4 D for just $360! Now that is a fast lens. If you have been reading other photography blogs, photography magazines or talking to other photographers then there is a pretty good chance that you have hear the term “fast lens”. Contrary to popular belief this doesn’t mean if you throw it, it will get there faster. Nor does it mean that it is especially round or smooth so that it rolls faster. It simply means that you can use a faster shutter speed in darker situations. Bam.
Now let’s not forget people at the other end of the spectrum. Apertures range from 1.0 all the way to 91. Why would someone want an aperture of f/91? Because it is just perfect if you do long exposure photography, allowing you to use a much slower shutter speed in high-light situations by allowing only a tiny bit of light through.
This is something that you can’t see through your viewfinder and I doubt it shows up in liveview either, but I’ll need someone to verify that for me. Depth of field can ruin what would have been a fantastic photo in your eye piece, but it can also really add to it. Especially when it comes to nature and portraiture. Check out this much more likely real life example.

As you can see in the picture on the right I used an aperture of 22, the widest my camera can use, and a lot more is in focus. But if I wanted to pull the focus towards the flower, all I changed was the 22 to 5.6 and that’s not even the highest I could have used! If I had used a 3.5 aperture, the background, which is no longer in the focal range, would have been even blurrier. So how do you change the aperture setting? Well most DSLR’s will have an aperture setting in your scene wheel. On Nikon cameras it’s the “A” setting and on Canon cameras for some reason it’s “Av”.
Just a heads up, when experimenting with wide apertures and making the background out of focus, try using a manual focus setting on your lens. By changing your aperture ring manually it’s much easier to see what is and isn’t going to be in focus.
Happy snapping!!!

Pretty neat huh? As you can see as the f value decreases, the width increases. Just in case you are still trying to figure out my aperture-as-to-eyeballs analogy. When you walk into a dark room your pupils expand so that you can see. More light in, easier to see. Then someone turns on the light and it’s blinding. This is why when you want to do low-light photography it is best to buy a lens that has a wider than normal aperture. Unfortunately for photographers on a budget, this may mean using what’s called a “Fixed focal length” or “Prime” Lens.
If you have bought a DSLR that came with a lens then I’m 90% sure that it’s a zoom lens, meaning that it can zoom in and out. They do this because they are versatile lenses, not anything to write home about really, but great for getting started. Now if you look at the top of your lens you will see the name. Mine is named “AF-S Nikkor 18-55mm 1:3.5-5.6G VR” or “snappy” for short.
 I could go into what all the other stuff means and I will in another post but for now all we are concerned in is the 18-55 and the 3.5-5.6. This means that when my camera is all the way zoomed out at 18mm, the widest aperture I can use is f/3.5 and when I zoom in all the way to 55mm the widest I can use is limited to f/5.6. This is common with zoom lenses and in order to get wider apertures when you zoom in, you are going to have to spend more money. Of course there are exceptions that prove the rule.
You: “Hey Jimmy, how about an example?”
Me: I’M GETTING TO THAT!!!!!!
The Sigma APO 70-200mm F2.8 II EX DG Macro HSM Lens is, in my own opinion, the best super zoom lens in terms of value for money you can get at a measly $845. All the way zoomed in at 200mm, you can still use an f/2.8 aperture. Similar lenses such as the Nikon AF-S 70-200mm F2.8 G VR II will set you back a whopping $3,299!!! And it’s a HUGE lens! Of course the picture quality and performance is better, but at this point in time I can not justify buying a lens that was $600 less than my first car.
Getting back on topic, maybe $845 is still too much, but you really want to get into gig photography. Well don’t despair just yet, there is that other option, the prime lens.
Prime lens con: they don’t zoom at all, if you want a close up, you physically need to move closer. Pro: Wider apertures at cheaper prices!!!! On eBay you can get a Nikon AF 50mm f/1.4 D for just $360! Now that is a fast lens. If you have been reading other photography blogs, photography magazines or talking to other photographers then there is a pretty good chance that you have hear the term “fast lens”. Contrary to popular belief this doesn’t mean if you throw it, it will get there faster. Nor does it mean that it is especially round or smooth so that it rolls faster. It simply means that you can use a faster shutter speed in darker situations. Bam.
Now let’s not forget people at the other end of the spectrum. Apertures range from 1.0 all the way to 91. Why would someone want an aperture of f/91? Because it is just perfect if you do long exposure photography, allowing you to use a much slower shutter speed in high-light situations by allowing only a tiny bit of light through.
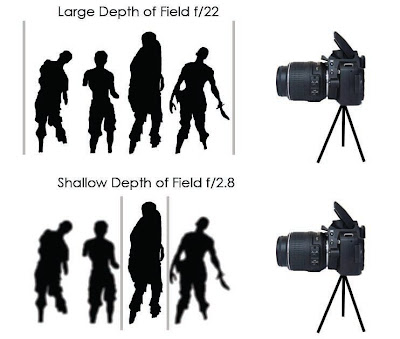
Okay, now that we have covered why you want a wider or smaller aperture, let’s talk about using it to add a lil’ sumim sumim to your pictures. You will notice that when you use a wider aperture your focal length will shrink dramatically. What's a focal length? I'm getting to that. Let’s say that a horde of zombies are coming to eat your brains and you figure “Hey, I could get a shot of this and maybe sell it to the news if the human race survives.” You want to use a fast shutter speed because lets face it; you’re running for your life at the same time and you don’t want the picture to come out shaken and blurry. Well watch out because if you use a really wide aperture the zombies in the middle might be in focus, but the zombies in front or behind wont be getting their 15 seconds of fame.

This is something that you can’t see through your viewfinder and I doubt it shows up in liveview either, but I’ll need someone to verify that for me. Depth of field can ruin what would have been a fantastic photo in your eye piece, but it can also really add to it. Especially when it comes to nature and portraiture. Check out this much more likely real life example.

As you can see in the picture on the right I used an aperture of 22, the widest my camera can use, and a lot more is in focus. But if I wanted to pull the focus towards the flower, all I changed was the 22 to 5.6 and that’s not even the highest I could have used! If I had used a 3.5 aperture, the background, which is no longer in the focal range, would have been even blurrier. So how do you change the aperture setting? Well most DSLR’s will have an aperture setting in your scene wheel. On Nikon cameras it’s the “A” setting and on Canon cameras for some reason it’s “Av”.
Just a heads up, when experimenting with wide apertures and making the background out of focus, try using a manual focus setting on your lens. By changing your aperture ring manually it’s much easier to see what is and isn’t going to be in focus.
Happy snapping!!!
Tuesday, December 22, 2009
INTERNET DOWN!!!!!!
Well...it happened. I know I shouldn't have, but curiosity got the best of me. I typed "google" into google and destroyed the internet. Luckily it only took down mine and not everybody elses, but it did mean I couldn't update for a while. I did keep writing them though, so starting tomorrow I will Begin posting again! Stay tuned!
Wednesday, December 9, 2009
Hey jimmy, where you at???
Well you may have noticed that I haven’t been updating so much lately? No, I haven’t forgotten about my loyal blog readers, but I have been swamped with work lately ANNNNND *exciting news drum roll* I’m moving the blog!!!! Moving to www.jimmyamerica.com. I haven’t really worked on the layout much yet, but it will be taking over. We have had some fun times here, but posting pictures is much easier when you aren’t using blogger. =(
Friday, November 20, 2009
Color Isolation
Hello again! As well as reviews, terminology and the latest news in the camera world, you will also find tutorials here! And here’s the first!!!
For this tutorial you will require Photoshop & Camera Raw
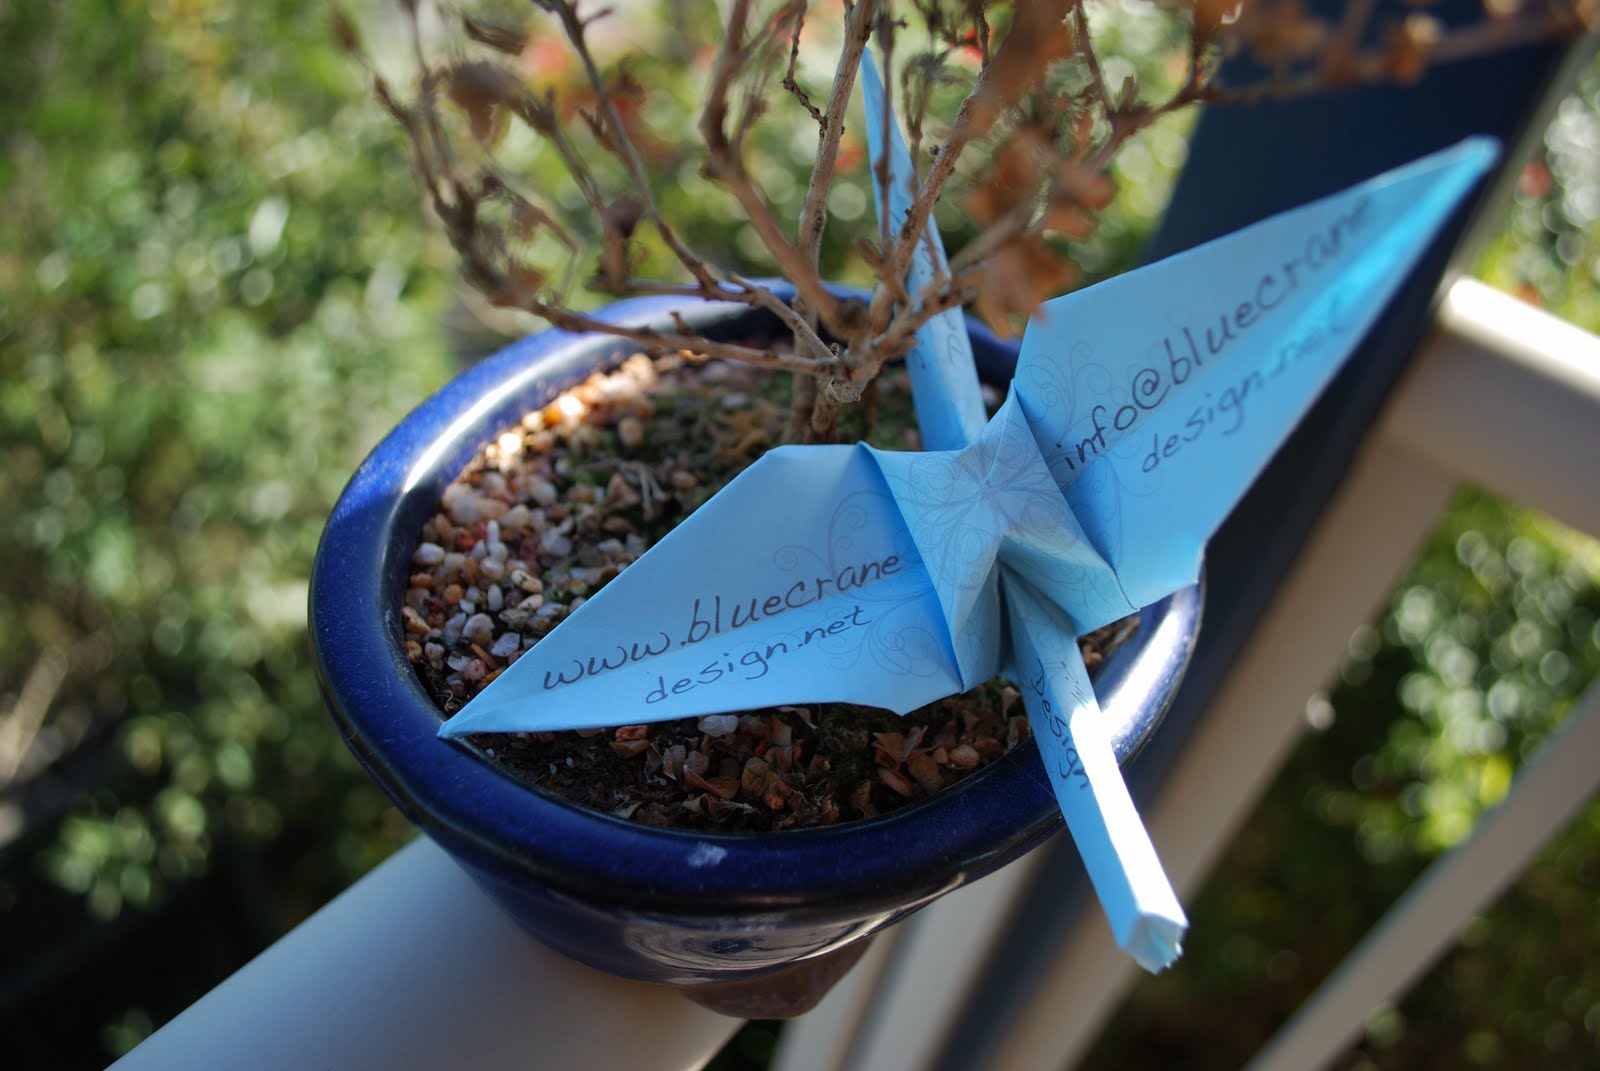
In this tutorial I’m going to bring more attention to something in your photo. This is great if the picture is a little bit cluttered or you feel like being artsy-fartsy. Ha ha ha, my edition of Microsoft Word recognises the word “artsy” but not “fartsy”. But back on topic, the example I’m using is a promotional picture for my graphic design business Blue Crane. One of our promotional tools is an origami crane with some of our contact details on it, but in the photo it’s a little bit lost amongst all the background colour. To remedy this I’m going to get rid of every colour except the Blue Crane blue. So lets get started!

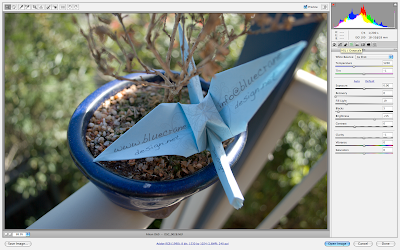
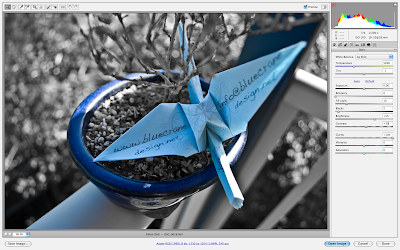
Bam! There’s the original picture and as you can see I’ve already pulled focus towards the crane by using a large aperture to blur the background, but more on apertures in the next post. So the first step is to open the image in Adobe Camera Raw. To do this on a Mac you just simply drag your RAW file (remember the talk we had about RAW images?) from the finder into Photoshop and Photoshop will launch Camera Raw automatically. On windows I’m not sure, but just try opening the picture and hope for the best. So when it opens it should look like this.
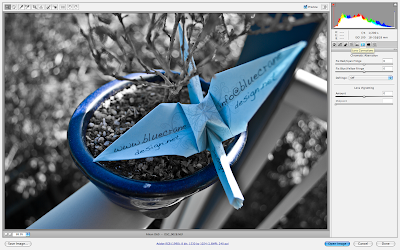
To start with lets go up to the HSL/Grayscale tab.
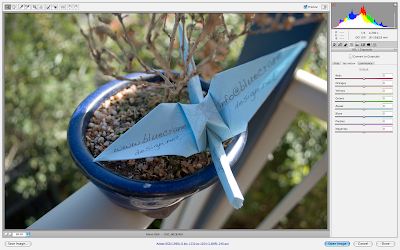
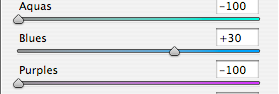
Since we are just interested in turning colours into black and white, click on the saturation tab. I want the blue to be the only colour left in this photo, so drag every colour slider EXCEPT blue all the way to the left.

You should pretty much see the desired result immediately, but let’s do a little bit more touching up. I’m going to boost the blue up a little bit more in the saturation department to +30.
So now let’s go back to the basics tab and up the clarity. I like really sharp images so I’m going to +100, but you do what you think looks right.
Then go up to the contrast tab and I’m just going to up it +30 and that will just be our little secret. But if you tell anyone…I’ll never be your friend again!!!!!
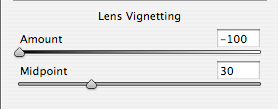
Now that we are done with that, let’s go up to the Lens Corrections tab.
What we are doing here is adding some Lens Vignetting. This is a really useful tab if you are shooting without a Lens Hood as it can add/remove the glare around the edges of your pictures, but we are going to use it artistically. I’m dragging it down to -100 and the midpoint to -30.
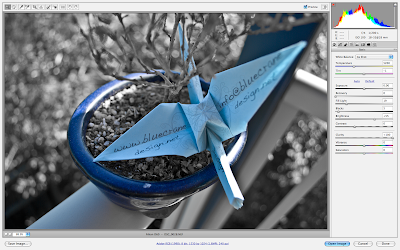
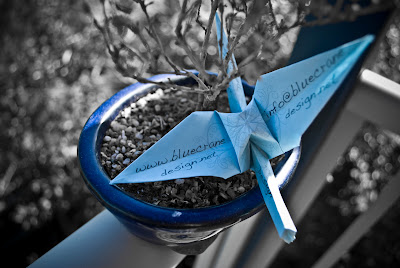
And viola! We are done. Now let’s take a look at that final picture.
For this tutorial you will require Photoshop & Camera Raw
In this tutorial I’m going to bring more attention to something in your photo. This is great if the picture is a little bit cluttered or you feel like being artsy-fartsy. Ha ha ha, my edition of Microsoft Word recognises the word “artsy” but not “fartsy”. But back on topic, the example I’m using is a promotional picture for my graphic design business Blue Crane. One of our promotional tools is an origami crane with some of our contact details on it, but in the photo it’s a little bit lost amongst all the background colour. To remedy this I’m going to get rid of every colour except the Blue Crane blue. So lets get started!
Bam! There’s the original picture and as you can see I’ve already pulled focus towards the crane by using a large aperture to blur the background, but more on apertures in the next post. So the first step is to open the image in Adobe Camera Raw. To do this on a Mac you just simply drag your RAW file (remember the talk we had about RAW images?) from the finder into Photoshop and Photoshop will launch Camera Raw automatically. On windows I’m not sure, but just try opening the picture and hope for the best. So when it opens it should look like this.

To start with lets go up to the HSL/Grayscale tab.

Since we are just interested in turning colours into black and white, click on the saturation tab. I want the blue to be the only colour left in this photo, so drag every colour slider EXCEPT blue all the way to the left.

You should pretty much see the desired result immediately, but let’s do a little bit more touching up. I’m going to boost the blue up a little bit more in the saturation department to +30.

So now let’s go back to the basics tab and up the clarity. I like really sharp images so I’m going to +100, but you do what you think looks right.

Then go up to the contrast tab and I’m just going to up it +30 and that will just be our little secret. But if you tell anyone…I’ll never be your friend again!!!!!

Now that we are done with that, let’s go up to the Lens Corrections tab.

What we are doing here is adding some Lens Vignetting. This is a really useful tab if you are shooting without a Lens Hood as it can add/remove the glare around the edges of your pictures, but we are going to use it artistically. I’m dragging it down to -100 and the midpoint to -30.

And viola! We are done. Now let’s take a look at that final picture.

Friday, November 13, 2009
$oftware!!!! Which One Do I Need And What's It Gonna Cost Me?
Aloha! I wanted to write a tutorial on an easy image editing technique today, but before I go into detail on using Camera Raw, I think I’ll write about some different pieces of software that are good to have.
As a photographer you are probably going to take hundreds upon hundreds of photos and you are probably going to want a program that can keep track of all these. Of course when you buy a camera it usually comes with software that will transfer your photos and organise them for you. When you buy a Nikon for example, it comes with ViewNX. I thought ViewNX was a pretty good program for a while but gradually it started to break down. By this I mean the icon previews in some of the first picture folders I created have started to play a game called musical previews where they swap themselves around and now I don’t know what the picture is actually of until I open it. Devastating? No, not really, but it is annoying. Lucky for me (and you) plenty of other software companies have created some really useful programs. There are heaps of them out there, but I’m just going to talk about some of the most popular ones.
Lets start with one that everyone can use! Adobe Lightroom is a useful little program that not only organises your pictures but also has quite a few other features as well. Lets take a look!
- Easy to organize image collections
- Basic editing options for both RAW and JPEG file types
- Slideshow capabilities
- Layout option and preferences for printing
- Can create image galleries and upload them to the web for a portfolio
![]() Sounds pretty good huh? But maybe you want some more image editing capabilities. Well if you happen to be a Mac user, then you need Aperture.
Sounds pretty good huh? But maybe you want some more image editing capabilities. Well if you happen to be a Mac user, then you need Aperture.
Aperture 2.0 was release d on February 12, 2008 and is a very similar program to Lightroom, but with Aperture you can download more than 70 plug-ins! It also has other useful features like being able to zoom in to 1600% and even more image editing options than lightroom, but come on! 70+ plug-ins!!!! You know that some of them have got to be awesome.
![]()
Of course if image editing is what you are really interested in, then you have to go with Photoshop. I’m sure that almost all of you have heard about this one as it is arguably one of the most widely used programs in the Adobe community. Photoshop offers thousands of editing options ranging from idiot proof to professional and it’s one drawback when compared to Lightroom or Aperture WAS that it couldn’t work with RAW files, but this has been mended with the introduction of the plug-in Camera Raw.
As you may remember from my last post where I briefly talked about RAW files, they are basically like Digital Negatives, hence the file extension .DNG. Although different companies use different extensions. Nikon for example calls them .NEF. When you switch through the different modes on your camera using the little wheel on the top you are actually making little changes to the ISO, shutter speed and other things. When you take the picture as a JPEG it applies all of this to the photo, then compresses it, causing a loss of quality. When you take the photo as a RAW file it keeps the information with the file, but doesn’t compress it. This means that you can change all the information later and you wont lose photo quality. Very useful. In Camera Raw you can make changes to all of those things AND it’s all done using sliders, making the process even simpler.And while on topic, one of the best things about Camera Raw is that it’s free! This is going to play a major roll in deciding which editing/organising software you go with. Let’s look at some prices
Aperture 2 will set you back $199, but is only $99 if you are upgrading from Aperture 1. Lightroom is $299, but once again only $99 to upgrade. Now as Photoshop is editing software it is going to cost you quite a bit more. $999 to buy it outright and $349 to upgrade from Photoshop CS3, but don’t fear, there are savings to be had! You can get a toned down version for $699 or a very basic version called Photoshop Elements for a limited time only price of $79.99! Then there is the Creative Suite bundles where you can get both Photoshop AND Lightroom in the same package! As well as a bunch of other programs you probably wont use unless you get into the graphic/web design field.
Well, I hope this has given you something to think about and you can look foreword to some tutorials where we will actually be using some of these programs to create MASTERPIECES!!!!!! Or at the very least help give your pictures a little something more.
Sunday, November 8, 2009
Choosing The Right Camera For You Part 2 aka Dude, What's My Start Up Time?
Welcome back to my post on choosing the right camera for you. I’m going to continue on with my list of camera features, starting up with start up times.
Start up time - If you are going to be shooting celebrities at their worst then this one is going to be VERY important to you. Different cameras start up at different speeds. I have always been impressed with the start up speed of the D60 despite the integrated cleaning system. You see, when my camera starts up the low pass filter vibrates to shake off any dust that may have settled on it to ensure clean crisp pictures. It also does this when I turn it off. And if you are interested, it also has a little air blowing system that directs dust away from the sensor. Fancy huh? I can’t say that I personally have been in too many situations where I have wanted to grab my camera and shoot pictures as quick as I could, but if you are going to be shooting sports or paparazzi style then this should be something you look up, as well as the FPS rate.
FPS - or “Frames Per Second” is how many pictures you can take in one second. Makes sense huh? The D60 takes 3 frames per second which works for me but there are faster ones out there. What you need here will again depend on what you want to shoot. If you want to shoot action you’ll need something faster than if you want to do landscapes.
Pixels - Some people will say “mine has more pixels, mine’s better!” but in some cases that’s just not true. If you have an APS-C sensor in two cameras, one with 12mp (mega pixels) and the other has something crazy like 30mp, the sensor size is the same and you are trying to squeeze much more information into the same sized space, so the information is going to spill into the surrounding pixels and this is called “Blooming”. Not good. Because of this I wouldn’t base which camera I got off of which had the most pixels, but instead have a look at the quality f the pictures produced. There are plenty of websites that review specific cameras and it wont be hard to find sample shots.

Buffer Time - Something to take into consideration when talking about shooting rate is the buffer rate or how long it can keep up the pace. DSLRs can shoot in different formats. In different cameras there are different options so I’ll stick with mine. I can shoot in three different JPEG formats; Basic (0.6mb) Norm (1.0mb) and Fine (1.9mb). Then there is the RAW format that is basically like a digital negative and allows for much more freedom in post-production, but takes up much more size (11mb). Then after that there is RAW+Basic which does exactly what it says, capturing the image in two files, one RAW and one basic JPEG (13mb). Larger files take longer to save to a memory card and while your camera is trying to save the files it can’t take more photos so you need to find a happy medium for the speed you need.
Durability - This isn’t just about how high you can drop the camera from without snapping it, it’s also how well it is protected from the elements like rain and dust. Someone who is going to be doing photo-journalism and taking pictures in deserts and war zones will really need to think about this, but also people like me who want to take photos at gigs. Think about all the arms and legs flailing about, as well as the beer and cigarettes flying about in the air. The do make element proof cameras, but this will add to the weight. Keep in mind that you can buy water and weather proof covers.
Battery expansion packs - If you are planning on photographing sporting events or even fashion events, you are going to need to have your camera on for long periods of time. Camera battery life is usually measured in exposures. But even if it has a shorter than average battery life, you can get battery expansion packs and some of them even have memory card expansions packs built in with them.
Other features - there are heaps of other features that might help you decided upon which camera you want to buy. Some of these are like “Auto Image Bracketing” which takes three photos with you release the shutter; one over exposed, one under and one perfectly exposed and you can set the exposure increments of these. This is a feature I wish I knew about before I bought my camera because mine doesn’t have it and it makes taking HDR photos sooooo much easier. Once again, another post for another day. Then there is in-camera photo editing and things like the ability to take your photos and turn them into a stop motion movie, or even being able to shoot HD movies. After that there is the capability to release the shutter remotely, via cable or a remote, and some remotes can control different functions on the camera, depending on the model. Some camera models even support Eye-fi cards, which are memory cards that can wirelessly transmit your pictures to your computer and/or storage device. One last awesome feature that onOne has created, an Iphone app that can work like a remote, but allow you to see what would normally be displayed on the LCD screen. It's sort of like a wireless Live View system, but you can also adjust your settings via your phone. How awesome is that!?!?!?! Read more about that particular feature by onOne Software here.
Thanks for reading and I hope that this has helped you understand the world of DSLR's a little bit better. Keep on coming back for my next article on apertures! If you have any questions, please feel free to ask, because that's how you learn, by asking. =)
Start up time - If you are going to be shooting celebrities at their worst then this one is going to be VERY important to you. Different cameras start up at different speeds. I have always been impressed with the start up speed of the D60 despite the integrated cleaning system. You see, when my camera starts up the low pass filter vibrates to shake off any dust that may have settled on it to ensure clean crisp pictures. It also does this when I turn it off. And if you are interested, it also has a little air blowing system that directs dust away from the sensor. Fancy huh? I can’t say that I personally have been in too many situations where I have wanted to grab my camera and shoot pictures as quick as I could, but if you are going to be shooting sports or paparazzi style then this should be something you look up, as well as the FPS rate.
FPS - or “Frames Per Second” is how many pictures you can take in one second. Makes sense huh? The D60 takes 3 frames per second which works for me but there are faster ones out there. What you need here will again depend on what you want to shoot. If you want to shoot action you’ll need something faster than if you want to do landscapes.
Pixels - Some people will say “mine has more pixels, mine’s better!” but in some cases that’s just not true. If you have an APS-C sensor in two cameras, one with 12mp (mega pixels) and the other has something crazy like 30mp, the sensor size is the same and you are trying to squeeze much more information into the same sized space, so the information is going to spill into the surrounding pixels and this is called “Blooming”. Not good. Because of this I wouldn’t base which camera I got off of which had the most pixels, but instead have a look at the quality f the pictures produced. There are plenty of websites that review specific cameras and it wont be hard to find sample shots.

Here is an example of blooming. It's not a great example because my camera controls bloom quite well, but you can see the light around the computer screen spilling into the surrounding pixels, creating a slight glow.
Buffer Time - Something to take into consideration when talking about shooting rate is the buffer rate or how long it can keep up the pace. DSLRs can shoot in different formats. In different cameras there are different options so I’ll stick with mine. I can shoot in three different JPEG formats; Basic (0.6mb) Norm (1.0mb) and Fine (1.9mb). Then there is the RAW format that is basically like a digital negative and allows for much more freedom in post-production, but takes up much more size (11mb). Then after that there is RAW+Basic which does exactly what it says, capturing the image in two files, one RAW and one basic JPEG (13mb). Larger files take longer to save to a memory card and while your camera is trying to save the files it can’t take more photos so you need to find a happy medium for the speed you need.
Durability - This isn’t just about how high you can drop the camera from without snapping it, it’s also how well it is protected from the elements like rain and dust. Someone who is going to be doing photo-journalism and taking pictures in deserts and war zones will really need to think about this, but also people like me who want to take photos at gigs. Think about all the arms and legs flailing about, as well as the beer and cigarettes flying about in the air. The do make element proof cameras, but this will add to the weight. Keep in mind that you can buy water and weather proof covers.

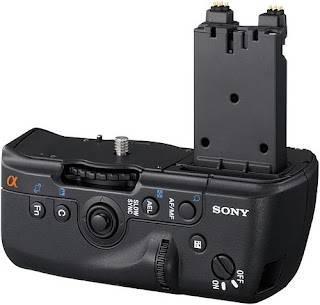
Battery expansion packs - If you are planning on photographing sporting events or even fashion events, you are going to need to have your camera on for long periods of time. Camera battery life is usually measured in exposures. But even if it has a shorter than average battery life, you can get battery expansion packs and some of them even have memory card expansions packs built in with them.

A Sony battery pack. Notice the extra buttons? Many battery expansion packs will also have controls such as another shutter release on them in odd places, until you go to shoot in portrait and find that it is just amazingly convenient.
Other features - there are heaps of other features that might help you decided upon which camera you want to buy. Some of these are like “Auto Image Bracketing” which takes three photos with you release the shutter; one over exposed, one under and one perfectly exposed and you can set the exposure increments of these. This is a feature I wish I knew about before I bought my camera because mine doesn’t have it and it makes taking HDR photos sooooo much easier. Once again, another post for another day. Then there is in-camera photo editing and things like the ability to take your photos and turn them into a stop motion movie, or even being able to shoot HD movies. After that there is the capability to release the shutter remotely, via cable or a remote, and some remotes can control different functions on the camera, depending on the model. Some camera models even support Eye-fi cards, which are memory cards that can wirelessly transmit your pictures to your computer and/or storage device. One last awesome feature that onOne has created, an Iphone app that can work like a remote, but allow you to see what would normally be displayed on the LCD screen. It's sort of like a wireless Live View system, but you can also adjust your settings via your phone. How awesome is that!?!?!?! Read more about that particular feature by onOne Software here.
Thanks for reading and I hope that this has helped you understand the world of DSLR's a little bit better. Keep on coming back for my next article on apertures! If you have any questions, please feel free to ask, because that's how you learn, by asking. =)
Subscribe to:
Comments (Atom)